


Setting Custom Domain Kosong dari Godaddy ke Blog Saya yang di Blogger (Blogspot)"Custom Domain merupakan nama domain pilihan yang bisa digunakan sebagai alternative menggantikan nama blog kita diblogger (blogspot). Kita bisa menggantikan alamatnamablog.blogspot.com dengan namablog.com atau .net, .info, .org, .web.id, atau dengan nama domain lainnya seperti yang saya lakukkan pada web saya "
dadangsuprayitno - villaqua - dahlaniskan"
Pada artikel kali ini akan saya jelaskan cara konfigurasi untuk custom domain di blogger (blogspot). seperti yang sudah saya lakukan pada http://www.villa-qua.blogspot.com menjadi http;//www.villaqua.com , http://www.kang-dadang.blogspot.com menjadi http://www.dadangsuprayitno.info. dan http://www.dahlaniskan1951.blogspot.com menjadi http;//www.dahlaniskan.info. Kenapa saya tidak bikin diWORDPRESS (ada beberapa blog saya di WP) alasannya karena untuk pindah domain di WP tidak gratis, anda dikenakan 10 USD.
Okey, prolognya sudah, Bahasan yang saya sampaikan ini nantinya hanya pada setting custom domain di blogger, setting nama server pada domain manage dan setting pada DNS (Domain Name System) pada layanan gratis saja (sebagai contoh www.godaddy.com ), kenapa yang gratis ? kenapa harus bayar biaya tambahan kalo ada yang gratis dan siapa sih yang gak mau gratis :), tentu saja saya mengupayakan dan mengajarkan cara yang simple, tanpa keluar biaya tambahan sedikitpun.
Jika sudah membeli dan memiliki nama domain sendiri (www.namaanda.com/net/info) sekarang saatnya kita melakukan konfigurasi. Ada 3 hal utama yang harus kita perhatikan seperti yang sudah saya sebutkan diatas, yang pertama yaitu mendafar ke layanan DNS gratis, saya sarankan sebaiknya kita memilih dan menggunakan layanan DNS gratis dibawah ini, jangan khawatir semua alamat dibawah langsung direkomendasikan oleh blogger.
Baca selengkapnya http://help.blogger.com/bin/answer.py?answer=58317
UBAH SETTINGAN DI DOMAIN MANAGER AKUN GODADDY ANDA
Pada pilihan diatas saya akan coba mengulas GoDaddy karena web saya kebanyakan di beli disini.
1. Log in to your account at www.godaddy.com
MASUK KE ACCOUNT GODADDY ANDA KLIK "LOGIN" isikan nama username dan password klik "GO"
2. Open the Domains tab and select My Domain Names. You'll be directed to the Domain Manager page. 3. Click the domain that you'd like to use with your blog.
KLIK "DOMAINS" TAB ----> "PILIH MY DOMAIN NAMES" ----> KLIK SALAH SATU NAMA DOMAIN YANG AKAN ANDA SETTING PADA KOTAK CEKLIST ---->AKAN MUNCUL HALAMAN "DOMAIN MANAGER"
4. Click the Total DNS Control And MX Records link at the bottom of the section entitled Total DNS.
KLIK "TOTAL DNS CONTROL AND MX RECORDS"
5. Click Add New CNAME Record in the box labelled CNAMES (aliases). If you've already created a CNAME record for your blog's address, click the pencil icon next to the existing CNAME record.
klik "ADD NEW CNAME RECORD" pada "CNAMES (aliases)" ---> tetapi jika anda telah memiliki CNAME RECORD klik saja simbol "PENCIL" pada "CNAME RECORD"--->akan muncul kotak dialog berisi------>enter an alias name, point to host name dan TTL.
6. For the Name, enter only the subdomain of the address you want to use for your blog. For example, if you picked www.mydomain.comas your address, enter www here. 7. Enter ghs.google.com as the Host Name. Specify a TTL or use the default setting of 1 hour.
pada ENTER an ALIAS NAME ketik wwwpada POINT TO HOST NAME ketik ghs.google.compada TTL setting defaultnya 1 HOURKLIK OKE
8. Click OK, and then click OK again.
SETELAH ANDA MENGUBAH SETTINGAN DI GODADDY SEKARANG ANDA MASUK KE BLOGSPOT ANDA.
Update Your Blogger Settings
Almost done! At this point, you have a domain name, and the DNS servers know to direct people to Google when they want to see your blog. But Google hosts lots of blogs, so we have to make sure the right one is associated with this domain. You'll do this on the Settings | Publishing tab for your blog in Blogger.
LOGIN KE BLOGSPOT ANDA -----> KLIK "SETTING" ----> KLIKK "PUBLISHING"

If you're publishing on BlogSpot, you'll see a link near the top offering to switch you to a custom domain. Go ahead and click that link.

KLIK "CUSTOM DOMAIN" ---->
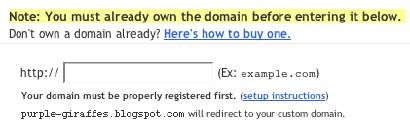
The Blog*Spot Address setting now changes to Your Domain. Fill in the domain you registered, and then save your settings.
----> KLIK "SWITCH TO ADVANCED SETTING" -----> MASUKKAN DOMAIN ANDA DENGAN WWW.NAMADOMAINANDA.COM/NET/INFO contoh: (www.dadangsuprayitno.info)
Advanced Settings
http:// (Ex: blog.example.com)Your domain must be properly registered first. (setup instructions)
We won't leave your readers behind!
http://dadangsuprayitno.blogspot.com will redirect to your custom domain.
INI UNTUK YANG BELI DOMAIN DI BLOGSPOT
SELANJUTNYA KLIK TOMBOL BUNDAR "NO"
If you specify a missing files host, Blogger will look there if it cannot find a specified file on your regular domain. Learn more


Type the characters you see in the picture. ----> ISIKAN WORD VERIFIKASI NYA SESUAI KARAKTER YANG MUNCUL
TUNGGU PALING LAMA 2 X 24 JAM BLOGSPOT ANDA AKAN OTOMATIS TER FORWARD KE NAMADOMAIN ANDA YANG BARU
Now the only thing left to do is to tell everybody about your new address!
Notes:
- If your new domain isn't taking you to your blog, wait another day or two to make sure all the DNS servers have been updated. If it still isn't working, contact your registrar to make sure you entered the DNS settings correctly.
- Your original Blog*Spot address will automatically forward to your new domain. That way, any existing links or bookmarks to your site will still work.
- You can use this feature with domains (e.g.
mysite.com) or subdomains (e.g. name.mysite.com). However, you cannot specify subdirectories (e.g. mysite.com/blog/) or wildcards (e.g. *.mysite.com). - Your posted images will continue to display on your blog as described here.
TERIMA KASIH SEMOGA BERMANFAATsumber www.help.blogger.comditerjemahkan secara gaya bahasa pribadi oleh kang dadang.
Setting Custom Domain Kosong dari Godaddy ke Blog Saya yang di Blogger (Blogspot)"Custom Domain merupakan nama domain pilihan yang bisa digunakan sebagai alternative menggantikan nama blog kita diblogger (blogspot). Kita bisa menggantikan alamatnamablog.blogspot.com dengan namablog.com atau .net, .info, .org, .web.id, atau dengan nama domain lainnya seperti yang saya lakukkan pada web saya "
dadangsuprayitno - villaqua - dahlaniskan"
Pada artikel kali ini akan saya jelaskan cara konfigurasi untuk custom domain di blogger (blogspot). seperti yang sudah saya lakukan pada http://www.villa-qua.blogspot.com menjadi http;//www.villaqua.com , http://www.kang-dadang.blogspot.com menjadi http://www.dadangsuprayitno.info. dan http://www.dahlaniskan1951.blogspot.com menjadi http;//www.dahlaniskan.info. Kenapa saya tidak bikin diWORDPRESS (ada beberapa blog saya di WP) alasannya karena untuk pindah domain di WP tidak gratis, anda dikenakan 10 USD.
Okey, prolognya sudah, Bahasan yang saya sampaikan ini nantinya hanya pada setting custom domain di blogger, setting nama server pada domain manage dan setting pada DNS (Domain Name System) pada layanan gratis saja (sebagai contoh www.godaddy.com ), kenapa yang gratis ? kenapa harus bayar biaya tambahan kalo ada yang gratis dan siapa sih yang gak mau gratis :), tentu saja saya mengupayakan dan mengajarkan cara yang simple, tanpa keluar biaya tambahan sedikitpun.
Jika sudah membeli dan memiliki nama domain sendiri (www.namaanda.com/net/info) sekarang saatnya kita melakukan konfigurasi. Ada 3 hal utama yang harus kita perhatikan seperti yang sudah saya sebutkan diatas, yang pertama yaitu mendafar ke layanan DNS gratis, saya sarankan sebaiknya kita memilih dan menggunakan layanan DNS gratis dibawah ini, jangan khawatir semua alamat dibawah langsung direkomendasikan oleh blogger.
Baca selengkapnya http://help.blogger.com/bin/answer.py?answer=58317
UBAH SETTINGAN DI DOMAIN MANAGER AKUN GODADDY ANDA
Pada pilihan diatas saya akan coba mengulas GoDaddy karena web saya kebanyakan di beli disini.
1. Log in to your account at www.godaddy.com
www.mydomain.comas your address, enter www here.ghs.google.com as the Host Name. Specify a TTL or use the default setting of 1 hour.
Almost done! At this point, you have a domain name, and the DNS servers know to direct people to Google when they want to see your blog. But Google hosts lots of blogs, so we have to make sure the right one is associated with this domain. You'll do this on the Settings | Publishing tab for your blog in Blogger. LOGIN KE BLOGSPOT ANDA -----> KLIK "SETTING" ----> KLIKK "PUBLISHING" If you're publishing on BlogSpot, you'll see a link near the top offering to switch you to a custom domain. Go ahead and click that link. KLIK "CUSTOM DOMAIN" ----> The Blog*Spot Address setting now changes to Your Domain. Fill in the domain you registered, and then save your settings. ----> KLIK "SWITCH TO ADVANCED SETTING" -----> MASUKKAN DOMAIN ANDA DENGAN WWW.NAMADOMAINANDA.COM/NET/INFO contoh: (www.dadangsuprayitno.info) Your domain must be properly registered first. (setup instructions) We won't leave your readers behind! INI UNTUK YANG BELI DOMAIN DI BLOGSPOT If you specify a missing files host, Blogger will look there if it cannot find a specified file on your regular domain. Learn more TUNGGU PALING LAMA 2 X 24 JAM BLOGSPOT ANDA AKAN OTOMATIS TER FORWARD KE NAMADOMAIN ANDA YANG BARU Now the only thing left to do is to tell everybody about your new address! Notes:SETELAH ANDA MENGUBAH SETTINGAN DI GODADDY SEKARANG ANDA MASUK KE BLOGSPOT ANDA.
Update Your Blogger Settings
Advanced Settings
blog.example.com)http://dadangsuprayitno.blogspot.com will redirect to your custom domain.
![]()
----> ISIKAN WORD VERIFIKASI NYA SESUAI KARAKTER YANG MUNCUL mysite.com) or subdomains (e.g. name.mysite.com). However, you cannot specify subdirectories (e.g. mysite.com/blog/) or wildcards (e.g. *.mysite.com).


0 comments:
Posting Komentar